ブログ記事SEOプラグイン開発について2
2010.01.05
前回、ブログ記事SEOプラグインの初期動作時に記事のDEファイルにkeywordカラムを追加するところまで説明しました。
ブログ記事SEOプラグイン開発について1
今回は記事投稿画面にメタ情報設定カスタムフィールドの表示とカスタムフィールドに入力した値をDBに保存するところまで紹介します。
今回のプラグインは管理画面側と公開側の両方で動作するので、プラグインの初期化時に追加する関数が管理画面側か公開側のどちらで動作するか分けます。
カスタムフィールドは管理画面側で動作するものなので
function init(){
    if(CMSPlugin::activeCheck($this->getId())){
        //管理画面側設定
        if(!defined("_SITE_ROOT_")){
            //記事投稿画面にフォームを表示する
            CMSPlugin::addCustomFieldFunction($this->getId(),"Entry.Detail",array($this,"onCallCustomField"));
            CMSPlugin::addCustomFieldFunction($this->getId(),"Blog.Entry", array($this, "onCallCustomField_inBlog"));
        //公開側設定
        }else{

        }
    }else{
        CMSPlugin::setEvent('onActive',$this->getId(),array($this,"createTable"));
    }
}
CMSPlugin::addCustomFieldFunction()で記事投稿ページにカスタムフィールドが追加されます。
このとき、第二引数に記事管理からの記事作成画面かブログ管理から記事作成画面でカスタムフィールドを設定するかを決めることが出来ます。
詳しい内容は省略しますが、addCustomFieldFunction()で追加したonCallCustomFieldメソッドを
function onCallCustomField(){
    $arg = SOY2PageController::getArguments();
    $entryId = @$arg[0];

    list($keyword,$description) = $this->getEntryInfo($entryId);

    ob_start();
    include(dirname(__FILE__) . "/keywordForm.php");
    $html = ob_get_contents();
    ob_end_clean();

    echo $html;
}
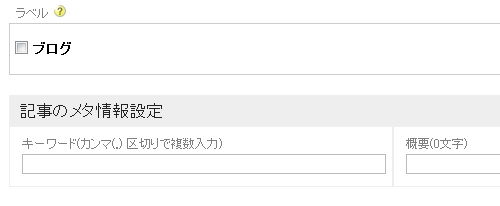
上記のように記述すれば、
記事投稿画面に上のイメージのようなカスタムフィールドが追加されます。
続いて、フォームに入力した値を作成したDBのカラムに挿入するために
function init(){
    if(CMSPlugin::activeCheck($this->getId())){
        //管理画面側設定
        if(!defined("_SITE_ROOT_")){

            //記事作成時にキーワードとdescriptinをDBに挿入する
            CMSPlugin::setEvent('onEntryUpdate',$this->getId(),array($this,"onEntryUpdate"));
            CMSPlugin::setEvent('onEntryCreate',$this->getId(),array($this,"onEntryUpdate"));

            CMSPlugin::addCustomFieldFunction($this->getId(),"Entry.Detail",array($this,"onCallCustomField"));
            CMSPlugin::addCustomFieldFunction($this->getId(),"Blog.Entry", array($this, "onCallCustomField_inBlog"));
        //公開側設定
        }else{

        }
    }else{
        CMSPlugin::setEvent('onActive',$this->getId(),array($this,"createTable"));
    }
}
管理画面側設定に記事を新規作成または更新時に動作するonEntryUpdataメソッドを追加します。
function onEntryUpdate($arg){
    $keyword = $_POST["keyword"];

    $entry = $arg["entry"];

    $arg = SOY2PageController::getArguments();
    $dao = new SOY2DAO();

    try{
        $dao->executeUpdateQuery("update Entry set keyword = :custom where Entry.id = :id",
        array(
            ":id"=>$entry->getId(),
            ":custom"=>$keyword
        ));
    }catch(Exception $e){
        return false;
    }
    return true;
}
記事作成画面で新規作成または更新を押したとき動作するメソッドに
DBにカスタムフィールドの値を挿入するロジックを記述します。
(descriptionの挿入は元から存在しているので、今回、ロジックを書いてDBに値を挿入する必要はない)
これで、記事作成画面にカスタムフィールドの追加とカスタムフィールドに入れた値の保存までが終わりました。
次回は保存した値を公開側ページに表示することを説明します。
